1st Position Blues – Crossing The Canyon
‘…Who shall tempt with wandering feet, The dark unbottomed infinite abyss, And through the palpable obscure find out, His uncouth way.’ Paradise Lost (Milton)
As a journeyman blues harp player, there comes a point when we start to explore blues in different positions. We learn that in theory the number of positions available on any one harp is exponential. In reality however, most of the top guys we listen to use only 1st, 2nd or 3rd position – straight, cross and slant harp respectively. Put simply, they can get the most effective results from these positions. We will look at 3rd position playing another time, but for now I want to focus on 1st position or straight harp.
I would bet any money that you learnt to play Amazing Grace, Camptown Races, When The Saints or Oh Susanna when you first picked up the harp! These are folk tunes we all know. They can be readily navigated in the key of the harmonica – normally starting from, or ending on, blow 4. That’s traditional straight harp. It’s what the diatonic harmonica was built for.
I’ll put another wager on the fact that, having cracked these pedestrian folk melodies, you then hurried off to cross harp blues playing on a mission to find all the funky bends necessary to sound like Little Walter, Big Walter, James Cotton, Kim Wilson, Sonny Terry and Sonny Boy II. That’s normal! Then you heard Jimmy Reed, or one or two tracks like Sonny Boy II’s Trust My Baby. Somehow cross harp wouldn’t quite deliver the goods. Because they’re playing a blues back in 1st position. Ouch!
So we have to go back to the drawing board and nail the safe notes, bends and licks for 1st position blues playing. As we do so, it quickly becomes apparent that everything seems to take place either at the bottom end or right at the top. Nothing happens in between. So we pick up the signature riff in holes 1 to 4. We learn to dig into, and milk, those crazy bends in draw 2 and 3. We also discover the value of octaving blow holes 1 and 4 to complete each phrase.
Sample 1st position low end signature riff: 3D 4B 3D 2D 3D 2D” 2D” 2B 1B … (or 1B-4B).
 Then we get musical and learn the licks that fit over the I, IV and V chords. We discover that a honking, weeping middle bend in draw 3, or a simple repeated switch between draw 3 and blow 4, gives us something to play over the IV chord, before returning to the signature riff over the I chord. Also that our second position trills and runs work well over the the V chord.
Then we stare at the top end, roll our sleeves up and burst a few blood vessels in search of those blow bends. Jimmy Reed has probably already spent most of the song up there. Honest I Do is a good example. Or else he’s started at the bottom end then jumped up top. Down in Virginia is a prime example.
Sample 1st position top end riff: 9B 9B’ 8B 9B 10B 10B” 9B 10B 9B’ 9B’ 8B 7B
Mark Feltham’s intro to Dog House has us dumbfounded at first. Then we hack into that blow bend monkey swing with him before jumping back down to familiar territory at the bottom end (all on a C harp where the blow bends are tighter than a fish’s chuff). For another consumate example of bottom and top end 1st position blues playing check out Home Run Hitter by Jerry Portnoy.
So why don’t we use the middle octave?
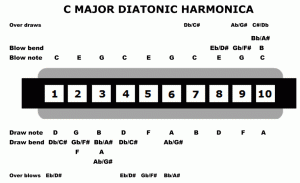
Because without overblows, we can’t produce a blues scale. On a C harp, the notes we need to find are C Eb F F# G Bb and C. At the top end these notes are fully available in 7B 8B’ 9D 9B’ 9B 10B’ 10B. At the bottom end we can get away with 1B 2B 2D” 2D’ 2D 3D’ 4D. I say ‘get away with’ because blow 2 gives us an E rather than Eb. But it works.  Technically there is an Eb available if you can overblow hole 1.
In the middle octave, we are missing Eb, F# and Bb – they’re pretty much all the blue notes! Unless we learn to overblow in holes 4, 5 and 6 respectively, we’re on a hiding to nothing. The C harp diagram illustrates this (click on the diagram to expand). Consequently most players stick with bottom and top end playing.
Here’s the diagram as a PDF for you to download and print.
Crossing the Canyon
So is there anything we can do if we don’t yet overblow? Yes there is! It’s not a lot but there is something. Let’s remind ourselves of the blues scale on a C harp: C Eb F F# G Bb and C and that the E in blow 2 works on the lower octave in lieu of the missing Eb.  Now look at holes 4 to 7 on the diagram. Much of the blues scale is lost in normal play, so we have to survive with the remaining safe notes. They are the blow notes C E G C in 4 5 6 and 7 respectively (but easy on the E in blow 5) and the F in draw hole 5.
I recently asked Charlie Musselwhite what he does to cross the Canyon in 1st position blues. His response was, ‘You just see what comes next or what sounds right to you, then start at the top. Get some practice in nomansland. Find out what works with you.’ At the time I was sceptical. This sounded too vague. The options are clearly limited. True to his word however – and why did I ever doubt him? – Charlie comes up with the goods half way through Blues Overtook Me.
1st position mid scale riff: 6B 5B 5D 5B 4B
This riff tucks nicely in just before shifting to the V chord and its associated second position licks. Try it. Meantime if I come across or invent any more Canyon Crossing Riffs I will add them to this post.
Good 1st position harpin to you!

