
Around the bend came the L&N
 There is no doubt that learning to draw bend marks the transition from beginner to intermediate harmonica playing. When we find our first bend, it feels like we’ve just won the lottery. After hours of perseverance, we’re punching the air and yelling ‘woohoo’ like Homer Simpson. We want to tell all our friends. We want to start a band too. And fair play; bending is what gives the diatonic harmonica it’s signature sound. We can now start to learn the coolest licks and enjoy a new universe of musical expression. This was probably the reason we chose to play the harmonica in the first place.
Mapping it out
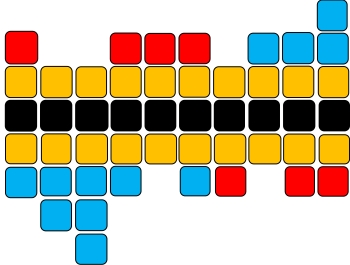
In our bid to master the art of draw bending, first it’s important to quantify the task in hand. Knowledge is power. It’ll also save embarrassment on the bandstand. We know that without any bending at all, we can produce 19 different notes on the 10 hole diatonic harmonica. These are the yellow squares in the picture above. You may be thinking ‘hold on a moment, 10 blow notes and 10 draw notes is a total of 20 notes’. Well fundamentally you’re right, however 3B and 2D repeat the same tone, so the available note selection is actually one less than 20. If this is new to you, try 3B and 2D on  your 10 hole harmonica now. There is a logical explanation for this duplication, which we cover in Why are 2 draw and 3 blow the same?, but for now, let’s get back to drawing board.

Terminology
With fluent use of the 12 regular bends (blue squares) and 7 over bends (red squares), it is possible to produce 38 new notes on the diatonic harmonica, simultaneously turning it into a fully chromatic instrument. But we’d have to be advanced players with many practise hours under our belts before we could manage all of these. For beginner and intermediate players, regular bends are plenty to be going on with. But just before we get stuck into them, let’s quickly clarify the terminology we’re using. Regular bends, the easiest bends to achieve, is a collective term for the eight regular draw bends (holes 1, 2, 3, 4 and 6) and the four regular blow bends (holes 8, 9, and 10). Once again, these are the blue squares in our diagram. Mastering all the regular bends will add twelve new notes to our tonal range. This is a significant achievement and mercifully they’re within everyone’s grasp. With the regular bends firmly in our skill set, and fluency in 1st, 2nd and 3rd positional playing, we are ready to realise our musical aspirations and share good times with others. Overbends is a collective term for the four overblows (holes 1, 4, 5, and 6) and the three overdraws (holes 7, 9 and 10), adding a final seven notes to our tonal range. And again, these are the red squares in our diagram.
Caveat Emptor
Unless we can already play individual notes cleanly and with tone, we’re on a hiding to nothing with reed bending. Air leakage, and catching neighbouring holes, strips us of the basic disciplines we need. If you have yet to master single note playing, put the quest for  bends on hold and learn this essential skill first. You’ll be glad you did.
Countless intermediate students have arrived at Harp Surgery lessons or workshops believing they can already bend. On closer scrutiny however, it is clear they have missed the basics, or their bends simply aren’t watertight. The Good Doctor’s advice to anyone investigating bends is be thorough. This skill makes our instrument unique and we need to understand how, why and where bends occur before we start to experiment. We must avoid approximating them, then going live armed with cheap imitations, in the belief we are already a Jedi harp master. Stark exposure can be a wounding lesson, and it’s best avoided.
So to begin with, ask yourself the following questions – and if you are uncertain about any of the answers, there’s important groundwork to be done. How many draw bends are there? How  many blow bends are there? Where are they all? Can you play them individually and accurately? Do you know what direct bends are? Are there bends in holes 5 and 7? What about hole 10? Which reed bends when we play a draw bend? What’s happening in each chamber when a bend takes place? What is the tonal theory behind bends? Be honest, because one thing’s certain: if you take time to perfect every aspect of bending from a knowledge perspective as well as a practical one, you’ll have built foundations that are far more solid than errant cohorts of other players. So let’s roll up our sleeves and let’s enjoy the journey to enlightenment.
Why bends happen
The answer is a quirk of engineering, some physics, some musical theory and a healthy dose of pure magic. First of all, bends occur where two free reeds share the same chamber  or channel. It is the interaction between these two reeds that is the source of bending. Valving reeds interrupts this process, which is why it is difficult to play bends on a chromatic harmonica. Where there is a difference in pitch between the two reeds of one full tone or more, physics says the potential for a half step bend has been created. As this difference in pitch, or interval, increases by an additional semitone, so an extra semitone bend is facilitated.
Let’s put that another way. Where two harmonica reeds equate to two white 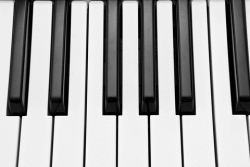 keys on the piano keyboard, if there are one or more other keys separating them you’ll find the equivalent bend, or bends, in the harmonica. So for example C and D are two white keys with one black key Db/C# dividing them. Two reeds with the same pitches of C and D, sharing the same channel in a harmonica, would facilitate the same semitone bend of Db/C#. This the case for holes 1 and 4 on a C major harmonica. In contrast, if our two reeds were B and C, or E and F, we wouldn’t find a bend as there is no key between these two keys on the piano. Admittedly, experienced players will say you can achieve a partial dip, but we won’t get snarled up in this debate just now.
How bends happen
In simple terms, whether drawing or blowing, regular bends move from the higher note to the lower note. In holes one to six, the higher notes are the draw notes, so we encounter draw bends. In holes seven to ten however, the higher notes are the blow notes, so we  encounter blow bends. But here’s the surprise – while the sensation of bending feels like we are dragging the higher reed down with our breath, the truth is the exact opposite. If you could watch the reeds while you played a bend, you’d actually notice the lower pitched reed moving more than the higher one. This is because the technique required to work the bend alters the air pressure across both reeds, effectively ‘neutralising’ the higher reed, as the lower reed moves ‘in sympathy’.
The technique involved is almost exactly the same as changing the pitch of a note when you whistle. When we blow or draw the higher reed normally, it vibrates in pitch. By adjusting our vocal tract – the area between the back of our tongue and back of our throat – and using our tongue as a plunger, we create the appropriate resonant space for our intended bent note and also apply the air-pressure needed to flex the reed, altering its pitch as we do so (it’s like playing a Swanee Whistle). The airflow across the higher reed slows and the lower reed starts to vibrate in sympathy. As the reed flexes, a dip  or bend in the tone results.
The bending process can be broken down into three steps. Firstly, the front of the tongue triggers the reed, by using a sipping movement or a more percussive ‘reverse spit’ (pretend to spit out a grape pip, then do this in reverse). Next comes the ‘K’ spot. Try saying ‘Kit-Kat’, or ‘Kah-kah-kah’, and notice how your tongue touches the roof of your mouth to produce the ‘K’ consonant. Now hold this contact point and pull the ‘K spot’ backwards as you breathe in through pursed lips. You’ll hear a sucking sound rather like a bicycle pump filling up. Finally, try whispering ‘hello Harry, how high have you hopped?’ or make a fake laugh ‘ha ha ha ha’. The ‘H’ spot is the control area you’ll be transferring everything towards at the back of your vocal tract. Arching your neck slightly can help create the extra space for this – especially on the deep draw bends in holes one and two. More about technique later. First let’s get theoretical…
Where bends happen
We have already learned that it’s the difference in pitch between two reeds sharing a channel that determines the potential for additional bent notes. So it follows that wherever the difference – or interval – between two reeds is greater than a semitone, you will find a 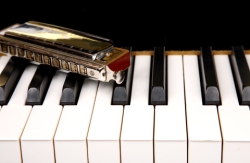 bent note. The greater the interval the greater the number of bent notes. Picture a piano. You have white and black keys. Consider the scale of C major (do re mi etc). It comprises eight full tones (the white keys) or a total of thirteen half tone steps (white and black keys). Moving from middle C to the next C across the eight white notes is diatonic, playing all thirteen half notes is chromatic. In regular blowing and drawing, we are only equipped with the white notes, and we have a complete major scale between holes 4 and 7. Hence a diatonic harmonica, rather than chromatic one. Regular bending enables us to find many, though not all, of the missing black keys. Overbending (red squares) fills in the remainder. Let’s look at the blue squares in more detail.
Quantifying the draw bends
 Our diagram of a C diatonic harmonica shows you which notes are found in each hole (click it to enlarge). Using a standard scale of chromatic notes, or a piano keyboard, we should be able to calculate the number of bends in each hole and their names. Here’s the chromatic sequence starting from A: A Bb B C C# D Eb E F F# G Ab A. For the technocrats, I am avoiding enharmonic tags as this fogs the issue. You will find enharmonics labelled in the diagram however.
In holes one and four, where the blow note is a C and the draw note is a D, there is one semitone in-between (C#) and correspondingly one draw bend. In hole two, where the blow note is an E and the draw note a G, there are two semitones between (F# and F) and correspondingly two draw bends. In hole three, the blow note is a G and the draw note is a  B, so there are three semitones between (Bb, A and Ab) and correspondingly three draw bends. In hole five, with blow E and draw F, there is no semitone interval and consequently no bend. Finally in hole six, with a blow G and a draw A, once again we have one semitone available (Ab) and correspondingly one draw bend. In short: 1 in 1, 2 in 2, 3 in 3, 1 in 4, 0 in 5 and 1 in 6. Understand and memorise this simple list; it will make you more informed than hundreds of other harmonica players. Remember too that in holes 6 to 10, the higher notes becomes blow notes, and so any bent notes will be blow bends. The how, why and where for blow bends is on a separate page. Back to draw bends. We’ve done the theory, so now it’s time to put everything into practise.
 Your passport to heaven
For any diatonic harmonica teacher, note bending is one of the hardest techniques to teach. It can’t be shown, it can only be demonstrated, explained and heard. Dave Barrett has produced an ultrasound video of the process, which is fascinating, but even this doesn’t teach us the practical skills we need. Ultimately, like walking, whistling and riding a bike, we have to work it out for ourselves. However, to help you on your way, here’s how the Good Doctor steers his students towards their Holy Grail.
• Accuracy and tone first
It’s fine to experiment with bends. Many players discover the 2D hole bend even before they know that bends officially exist! But there’s little point attempting bends before you can play clear, single notes with good tone. Only then are you able to direct your breath efficiently and only then are you truly ready for the next step.
• Maintain your embouchure
 Your lips shouldn’t spread wider or change shape as you bend. They are there to maintain a good seal around the target area. Loose air means no bend. The bending process then begins in your vocal tract and in your mind. By anticipating the bent note the rest will follow. It’s how we pitch our notes when we sing or whistle. The reeds replace your vocal chords!
Think the note
This may sound strange at first, but it helps. You prepare your vocal tract when you want to whistle a note without really thinking about it. The same goes for singing and speaking. Note bending follows the same path. The reeds replace your vocal chords! Then commit to the bend. It may not happen right away, but it can do. Someone once said it’s a bit like learning to swing as a kid. You have to overcome inertia by adjusting your balance, then master transferring your weight to regulate the oscillation. Bending a harmonica reed is also about finding the optimum balance of air flow, mouth shape, muscle control and force.
• Whistle backwards
Whistling normally at first, blow a high note and gradually lower the pitch as far as you can. Now try this in reverse, whistling inwards. Notice how your tongue and vocal tract positions alter. This is the same as the bending process, so all you need to do is attach your reverse whistle to a harmonica!
• The clutch analogy
As you start to bend, you engage the reed and feel a pull or purchase from the back of your tongue and your vocal tract. It’s like sipping froth from hot chocolate. As you start to pull your tongue back, the reed flexes and audibly dips or chokes for a split second.  This the bite point. When you learn to drive a manual car, you have to synchronise the clutch and accelerator (gas) pedals in order to engage the engine and pull forward. Miss the bite point and you stall the engine or the car kangaroos up the street. This is because you’re slipping the clutch. Learn to recognise the bite point as each bend engages. And as soon as the bend cuts in, increase the pull from your throat and chest. Attack it! Eventually you will feel the reed drop into a whole new position and the pitch will drop with it. If you overshoot the bite point, don’t hang on fruitlessly. This is wasted effort. Let it all go and start again.
• Ee-You-Yaw, the K Spot and Peanut Butter
This has nothing to do with melancholic donkeys or anatomy. This method demonstrates how control is transferred from the centre of your mouth tract to the back of your vocal tract. Your tongue effectively works as a plunger drawing the reed into a bend and holding it there. Start by saying ee-you-yore out loud. Running the words together, say this again and note what’s happening to your tongue. It falls back in stages until you are effectively ready to yawn. Now purse your lips, or tongue block, and articulate the same words, drawing inwards this time.
 Ee is the first stage of the process, when you engage the reed. You is the pre-bend, when you gain a purchase on the reed. You should detect an audible dip in the tone of the reed. Be aware that it’s easy to overshoot this point, as explained above. Yaw is when you transfer control to the back of your throat, applying more pressure to the reed as you do so and bending it accordingly. Apply this three-step process to 4D and see what happens. Now try it on 1D. Usually you’ll find that one of these starts to dip. A similar method is to say the letter K as we’ve mentioned before, and note where your tongue touches the roof of your mouth. Moving the K spot back will help engage the reed and deliver your bend. You can als add K to the words above for added effect; Kyee-Kyou-Kyaw. Failing all this, just pretend to be a kid with peanut butter stuck to the roof of your mouth and schlick it off with your tongue.
• Milk shake, snake bite and a bicycle pump
 Sounds like quite a partay! But seriously, sometimes it helps to imagine yourself pulling thick milkshake through a straw, or sucking venom from a snake bite. The sucking or plunger process created by the tongue is integral to draw bending on the harmonica. If shakes and snakes don’t do it for you though, picture a standard bicycle pump. As you pull the top end of the pump, it draws in air. You’re doing the same on the harmonica with your tongue acting as the pump.
• Abseiling
 I make no apology if abseiling and reed bending appear totally unrelated. However, you will understand this analogy if you have actually abseiled; especially if you can recall the very first time. When you leaned back into nothing with only a rope to keep you from falling, your heart was racing and you felt a rush of adrenalin. Well note bending is a similar leap of faith. You don’t know what you’re trying to find, whether you’ll get there in one piece, or what it’ll be like on the way down, but once you make the break through, it feels fantastic. So lean back and take the reed with you. All the way to the bottom.
• Sip and Swallow
 To get used to the transfer of control centres when attempting low end draw bends in holes 1, 2 and 3, consider the way you might drink a cup of hot chocolate. Initially you’re going to sip the froth using your lips, the tip of your tongue and a tug of air between your teeth. As the sipped liquid cools in your mouth, you’re then ready to swallow it. Sipping and swallowing are the start and end control points of low end draw bends. In time, as your throat muscles strengthen, you’ll learn to pull directly from the vocal tract. The 4D’ and 6D’ bends are one shorter reeds however, and the control point tends to remain further forward in the mouth.
Different reeds have different characters
When you start out, you will notice how some bends seem easier than others. More often than not the two draw bend can be elusive and the three draw bend can be hard work. Don’t lose heart. It will all come with practice. The lower reeds take more effort because they are longer and more air is being moved. You will learn to adjust and your head may drop slightly to afford more space for your tongue and vocal tract to retreat. In time you will also learn to economise your effort, getting more bend for your pound per square inch (psi).
Direct bending
Once you have found all your bends, there’s still plenty of work to be done. You’re probably still approaching them from above – scooping into them. This is normal, but eventually you will need  to treat each bent note as an individual piano key. This is called direct bending. To master this skill, start by moving between a clean draw and a full bend, down and up, as slowly as possible. This will help you develop muscle memory and strengthen your bending technique. In the holes that have more than one bent note, 2D and 3D, pause and hold each semitone bend momentarily en route as you descend and ascend. Finally, you need to hit each bend in isolation. And yes this includes all three in hole three. For every hole though, a good trick is to remember you also have a blow note and to include this in your training. Map out a steady journey from the clean draw, down to the full bend and out on the blow note. Now do this in reverse, without scooping as you move from the blow note to the full bend. This will help you to nail the full direct bend. In holes 2D and 3D, you’ll also need to disengage the full bend and reach for the middle bend(s) without scooping, before working your way back up to the clean draw. This is where the muscle memory you developed moving up and down at a snails pace will pay dividends. Slow and steady wins the race. Now check out our Beef Up Your Bends series (see the mini-menu on the right of the screen).
The trigger
You may find it helps to trigger direct bends by placing your tongue behind your teeth and sounding a short reversed ‘tuh’ to get things started. Alternatively, try using the K spot further back and attack the direct bend with a reverse ‘Kooo.’ It is normal to scoop into direct bends until you develop enough muscle memory to hit them head on. Throw away your crutches as soon as possible and learn to play each one cleanly. Accurate direct bending marks the difference between those who think they can bend, and those who know they can.
How do I know I am getting an accurate bend?
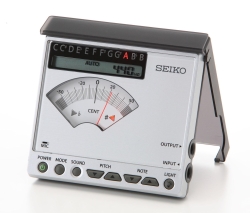 A pitch pipe, piano or correctly tuned guitar will give you the notes you need. Play the target note and try to match it with your bent note. This is a good method as you are developing your musical ear at the same time. There are also many tutorial CD’s that will give you the notes you need. But if you’re worried about whether your bent note is scientifically accurate, then you can buy an electronic tuner. There are many types; we use a SEIKO Chromatic Tuner Model SAT1100 that uses
 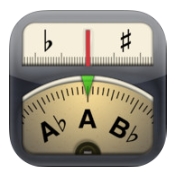 two AAA batteries. You can find it on Amazon and eBay. Otherwise, for Apple iPad users, there’s the Cleartunes app, which is a cheaper option and just as good. There’s also the Bend It Better™ online app at J P Allen’s website. But you could always save your money, play songs that require bent notes and use your ears to judge whether or not you’re playing accurately. Or better still, record yourself and listen back. You’ll be surprised by what you hear; no accurate bends, no tune!
Do’s and don’ts
Do persevere. Do be thorough. Do perfect your direct bends. Don’t be satisfied with half measures. Drag those whole bends right down into the muck! Don’t avoid the 3D bends. They are tricky and their inherent inaccuracy is the weak point on the diatonic harmonica. Embrace it!
Pingback: Bending - Musiker-Board